Response / Calibration
The Response / Calibration tab of the trigger editor encompasses every setting which affects the trigger's "feel".
Here we'll walk through each section in depth:
Noise Floor
This setting determines the minimum amount of force you need to use before your Zendrum will register a strike.
If you use a low value then sensitivity is increased at the risk of false triggers from errant vibrations or strikes to adjacent pads. A higher value reduces false triggering but at the expense of sensitivity. The default value is 6.
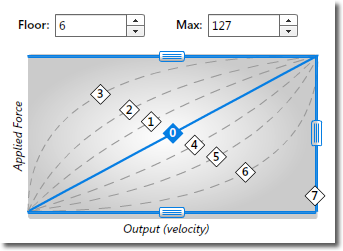
You can change the floor value by directly typing in a value or by using the 'spin' buttons. You can also drag the lower horizontal bar within the calibration graph.
Note that the noise floor value affects the dynamic range of the trigger but not the velocity curve. Setting the noise floor to 10 for example does not mean you will only see velocity values above 10. In affect it is moving the value of zero up or down. You can visualize this in the calibration graph -- as you drag the lower bar up, the response curves all squeeze together rather than being truncated. This is in effect "squeezing" the dynamic range. Your Zendrum will still output velocity values from 1 to 127 (or your max volume setting), it just will do so within a reduced range of physical force (the y-axis of the graph).
Also of interest is that the noise floor value need not be a whole number such as it is if editing directly on a Zendrum. With ZenEdit you have more fine-grained control and can set fractional values for the noise floor, such as 6.2.
Maximum Force
This value determines the amount of force required to register a maximum velocity of 127. For triggers, you will generally want to leave this at its maximum in order to have the widest possible dynamic range. For change controllers however, you may find that you need to lower the value to taste. Consider for instance a volume pedal. When the pedal is in its rest state, it should be registering a value of 0. The noise floor value determines how far the pedal needs to be depressed to start registering values. The maximum force value in turn determines how far the pedal must be depressed to register a value of 127. If for instance you are seeing a value of 127 when the pedal is only half way depressed, then changing the maximum force setting to 64 will change it so that you don't see a value of 127 until the pedal is fully depressed.
The maximum force setting, together with noise floor determine the calibration profile for a given control. It is important that variable pedals, knobs, etc. are properly calibrated so that you have the full range of expression available during your performance.
In addition to typing a value for maximum force in directly, you can drag the upper horizontal bar within the calibration graph. Notice that this does not affect the end points of the response curve but instead merely squeezes the dynamic range.
Maximum Volume (velocity)
The maximum volume is actually set at the User Setup level, not individually for triggers. To enter values in directly, use the control on the User Setup editor. You can however also edit this value here by dragging the vertical bar in the calibration graph. This bar and the edit control in the User Setup editor are linked so you will see them change together.
Notice as you modify the max volume setting that the graph clips. It is important to understand that your Zendrum does not recalculate the end points of your response curve when the max velocity is set, it merely caps the outputted velocity value. It also bears repeating that this value is universal to an entire User Setup and cannot be set for individual triggers.
Response Curve
Each of the 7 available response curves are displayed visually on the calibration graph. To change the response curve, simply click on the numbered diamonds. The default curve is #0 (linear).
Invert Polarity
Below the calibration graph is a checkbox which controls the polarity of the control. When checked, the entire chart is inverted and outputted values fall from 127 to 0 rather than rising from 0 to 127.
Note that this feature is not supported for MIDI Note ON messages and therefore the checkbox will be disabled for these. Change controllers such as your momentary switch will have access to this feature however.