Editing Triggers
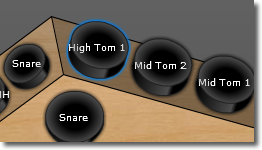
To edit a trigger, first select it by clicking on it with the mouse. Selected triggers are indicated with a blue border:
When a trigger is selected, the trigger edit pane at the bottom of the screen becomes active. This edit pane is where you make any changes to the selected trigger.
Editing Multiple Triggers At Once
You are not limited to editing a single trigger at a time. ZenEdit also allows to select multiple triggers and edit them all at once using either of the following techniques:
To select a range of triggers:
To select ALL triggers:
To select a variety of triggers:
Note that when multiple triggers are selected, the title pane of the trigger edit pane will display the number of selected triggers. For some of the editable attributes shown in the pane, ZenEdit may display a "blank" value. This is done whenever the selected triggers do not all share the same value. For instance if you've selected 4 triggers that all have the same MIDI channel but different note values, the channel selection control would show the channel that they all share however the note selection control would be blank.
Please note that you cannot select multiple triggers that do not all have the same MIDI status type at this time. Also note that "select all" will only select the triggers that are on the Zendrum body as you typically would not be editing your CC controls at that time.
You can also right-click on a trigger to select all other triggers that have the same note number.
Swapping Triggers
You can quickly swap the content of two triggers by simply 'dragging' one onto another. The values that are swapped are:
Copying Triggers
If you hold the Cmd or Ctrl key down while dragging one trigger onto another, a copy will be made instead of a swap. Only the values listed above under 'swapping' are copied.
Making Trigger Edits
Once you've selected a trigger to edit, use the controls within the trigger edit pane to effect your changes.
Note: The most basic trigger setting is the MIDI note value. Use the note selection control to change which MIDI note value is sent when you hit the trigger. You can also quickly access the note picker for a given trigger by double-clicking the trigger with the mouse.
Crossfade Notes: Your Zendrum supports a "crossfade" feature. When enabled, the trigger can send up to four different note values depending on how hard you hit it. ZenEdit allows you to set an individual note value for each of these "crossfade points". To enable crossfade for the trigger(s), press the "x4" button (press it again to turn it off). When crossfade is enabled, four separate note selection controls will appear, allowing you to select one for each crossfade point. Note that ZenEdit also allows to tweak the exact crossfade velocities as well.
Channel: Each trigger may have a separate MIDI channel set. This allows you to set up certain triggers to send MIDI messages to multiple sound sources. Use the channel selection control to make your channel edits. The default channel is #10 (drums). Note that the channel selection control will in addition to numeric values also show the mapping that is assigned to each channel. Make sure you've setup your channel mappings properly.
(Response) Curve: For each trigger you may set an individual trigger response curve. To change the response curve, click on the desired number with the mouse, within the calibration graph.
Noise Floor: You may set an individual noise floor (from 0 to 127) for each trigger. The default value is 6. Lower values increase trigger sensitivity at the risk of misfiring.
Trigger Ceiling (Max): You may set an individual value (from 0 to 127) for each trigger. You will typically leave this at the default value of 127. This setting is not exposed by your Zendrum, except when you do a manual calibration. The floor and max settings together determine the dynamic range of your trigger or control. The max control is most important in relation to knobs or pedal controls rather than triggers. Its value is defined as' the point at which a maximum velocity value of 127 is outputted'.
Polarity: For CCs and other controls it is possible to invert the polarity. This reverses the direction of the graph (control). For the momentary button, this switches between a normally open to a normally closed state. For knob and pedals this changes whether the values go up or down as it is depressed or turned.
MIDI Message: You are not restricted to sending only NOTE or CC messages. ZenEdit enables you to perform more advanced MIDI programming. See the entry on MIDI Messages for full details.
Input Type: This value determines whether a control is a trigger pad, a foot switch, volume knob, etc. If you have a stock Zendrum then you likely will not need to change the factory defaults. Otherwise see the entry on Input Types for more info.
Duration: The factory default value for the time that elapses between MIDI Note ON and Note OFF messages is 10 milliseconds. If you are using your Zendrum for melodic performance then you will likely want to increase this value. Clicking on the duration link will bring up the Duration Editing Window which allows you to fine tune this setting.
Size: If you've customized the available triggers on your Zendrum then it is possible that the default size selected by ZenEdit does not match your personal instrument. Use the size control to switch a large trigger out for a smaller one or vice-versa.
Color: You can customize the displayed color for each trigger. This has no effect on your Zendrum settings and exists only for your own benefit while mapping out a layout that works for you, of for grouping triggers visually, etc.
Melodic Mode: Triggers that are in melodic mode will display note names and the piano roll within the note editor.
Show Note Numbers: When enabled, the numeric MIDI note number is displayed in addition to the mapping name (Kick, Snare, etc).
Comments: The comments section allows you to annotate the selected trigger(s) to help you or anyone you share the project file with see any information pertinent to it. These comments are also displayed in the Trigger Summary Report.